
Overview
Once you navigate to Project > Host > Pages you will be presented the following screen:

You will notice that there are 3 panes:
- List Pane - Lists all pages and controls to manage website settings.
- Editor Pane - Allows you to edit the page, insert widgets, and control page settings.
- Preview Pane - Builds the page as you save the page content and lets you preview the web page.
BakeMyWeb automatically generates url from your content structure. Just like you would manage folders and files on your computer, you can manage folders and web pages.
Types of Pages
By default, different kind of pages have different layout and it differs from theme to theme. In general, you will have the following types of pages:
Home Page
On the listing pane Home signifies home page for your web site. You can insert various widgets in your home page (or any other page) to make it relevant and attractive.
Authors
There can be many Authors writing content for your website. You may want to add specific Authors page so that the content is tagged to the particular author. Most of the layouts are designed such that Posts show Authors prominently, while pages do not.
Fragments
Fragments are reusable text that you may write once and use multiple times across your website using widgets that support fragments.
Learn
By default, a folder called Learn is provided that contains documentation for your website. You can structure your content similarly as you would structure your folder and files. Think of folders as chapter or topic headings, while the pages are just that... pages for your content.
The web pages and links are generated automatically along with internal navigation. The page you are reading now, is an example of a Learn page. You can create various tutorials in the same web site with different names at the root level.
Pages
Internally, a normal page & learn pages are not very different. They just have different layouts. If you go to the About Page you will notice some differences in the layout compared to the current page (notice the missing left pane and table of contents on the right).
You should think of pages as parts of your website that do not have relation to other pages directly and doesn't need internal built-in navigation. To navigate to these pages, you will have to either link a menu item, footer item, or simply link to it from other pages. Note that any page can be linked to another page. Learn more about pages here.
Posts
A blog (short for "weblog") is an online journal or informational website that is updated regularly. Blogs are typically written in a conversational style and often include personal opinions and thoughts. They can be about anything, from personal experiences to current events to product reviews.
Blogs are typically organised chronologically, with the most recent posts appearing first. They often include links to other websites, images, and videos. Blogs can be a great way to share information, connect with others, and build a following.
You can write a post with BakeMyWeb just as easily like you create pages. Each blog post can be tagged with data like "Authors", "Tags" & "Series". While building your website, BakeMyWeb automatically creates appropriate links and you don't have to do anything extra for linking :thumbs_up:
References
References are special pages that could be referred to using the
reference widget. It is easier to explain it with an example. The following link about an
emoji takes you there, but the reference link for emoji
makes the content interactive and allows you to click to get information right here without navigating to the emoji page. You can define your references and use it across all pages. Thereafter, if you choose to change the definition, you have to change it just one place and it is updated across the website! How cool is that :smiling_face_with_sunglasses:?
Series
While creating the blog posts, you may want to write it in multiple parts. You can add "Series" information to the post settings so that all related posts automatically get tagged in a specific series. All posts that are in the series will automatically show the series information so that there is another layer of built in navigation that users usually love ❤️.
Tags
Tags are applicable to each post just like series. You basically tag related content together. A built in navigation with tags allows end users to navigate the site freely. Think of a tag as a subset of your posts while series is a collection of articles in serial order. In a tag, all posts are shown that has the same tag. Series however, can span across various tags and lists only the posts with same series information.
Create new content
To create new content, hover on pages folder and click Create Folder or Create Page.

The content structure leads directly to an appropriate path (website url). For instance, if your reserved domain is called mydomain.bakemyweb.com, your url would be as follows if you have created the structure below:
pages
- about             : https://mydomain.bakemyweb.com/pages/about
- contact           : https://mydomain.bakemyweb.com/pages/contact
- my-folder/page-1  : https://mydomain.bakemyweb.com/pages/my-folder/page-1
- another/page-2    : https://mydomain.bakemyweb.com/pages/another/page-2
Working with Editor
The first step towards using the editor is to select a page in the listing pane
. The editor fully supports the
markdown convention and if you aren't familiar with it already, we strongly recommend learning it. It is quick and you can
learn it in less than 10 mins.
Save your content

In the image above, you can see the selected page is learn > advanced > caramalizing-sugar-1 and the text is loaded in the right pane. You can start typing text in the editor and save it periodically using the Save Current Page icon so you don't lose your changes!
Adding Widgets
Click on the + button in the Editor pane, and you will be presented a screen that says Add a Widget. Widgets
are the key to make your content pop-out. To make your selection eesier, the widgets are categorised and you can search or browse to find the most suitable one.

Once you have finalised the widget, click on + button on the selected design to add the selected widget inside the editor.
Widget Settings
Every widget is highly customisable and you will be able to see various intuitive settings. You can configure the widget using these settings and get a fancy looking output without learning HTML, CSS, JavaScript or anything regarding managing servers.

Widget Output
For example, tweaking some settings in the widget configuration above has yielded the following output:

Inserting Image
Images can be inserted just like you insert a widget. You can add an image from an external site, or an image from your collection that you manage using Project > Host > Images.
Inserting Emojis
Who doesn't like a well placed emoji? It adds a certain character to the page. Click on the emoji icon and search for just the right one. Here, a quick search for heart reveals a bunch of emojis. Click the one you like and it will be inserted.

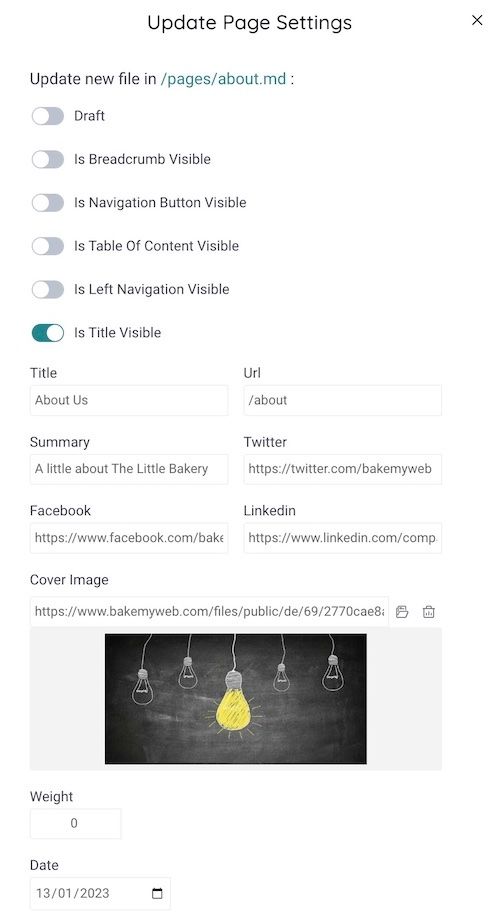
Page Settings
For BakeMyWeb, every folder and file in the list pane has its own corresponding settings.
Raw Editor
If you really want to get your hands dirty and like to edit Raw text, use the Switch to Raw Text editor option by click </> button.
Delete a Page
To delete a page, hit that Bin icon. But do proceed with caution since a page once deleted cannot be recovered.
Preview the current Page
You can use the Project > Pages > Preview > Preview Side By Side or Project > Pages > Preview > Preview in Another Tab to view the preview of the current page. Every time you save the page, preview will be regenerated and automatically updated on the side view. If you used another tab option, you will need to refresh the page in order to preview the latest.
Publishing your Website
BakeMyWeb is a static site generator. That means, you will need to build and publish the site in order to make all the changes go live. Static websites are built using static files, such as HTML, CSS, and JavaScript. These files are stored on a web server and are delivered to users' browsers as-is. This means that there is no server-side processing involved, which can make static websites very fast and efficient.
Here are some of the advantages of statically built websites:
- Faster loading times: Static websites are typically much faster than dynamic websites, which require server-side processing. This is because static websites do not need to wait for the server to generate the page content before it can be delivered to the user.
- Lower hosting costs: Static websites can be hosted on inexpensive shared hosting plans, as they do not require the same level of resources as dynamic websites.
- Increased security: Static websites are less vulnerable to security attacks than dynamic websites. This is because static websites do not contain any sensitive data, such as user login information or credit card numbers.
- Ease of maintenance: Static websites are easier to maintain than dynamic websites. This is because changes to the content of a static website can be made simply by editing the HTML, CSS, or JavaScript files.
- Better SEO: Static websites are typically better optimised for search engines than dynamic websites. This is because static websites have a simpler structure and are easier for search engines to crawl and index.
Overall, static websites are a good choice for websites that do not require a lot of dynamic content. They are fast, secure, and easy to maintain. If you are looking for a website that is simple and efficient, BakeMyWeb is the perfect choice.
I have read this

